Assembling the 24″ Ribbon and Bow Shelf

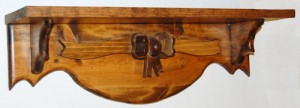
Photo of the Ribbon and Bow Shelf

24" Ribbon and Bow Shelf

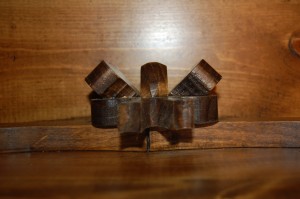
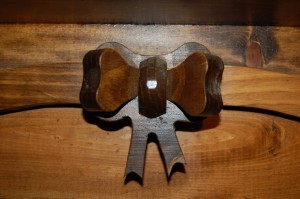
In this final article about the 24″ Ribbon and Bow Shelf, we will be assembling all the parts that were cut out in all the previous articles. The assembly process is fairly straightforward, however, there are a couple of points that will improve the appearance of the shelf. Continue reading

Posted in Wood Projects | Tagged , , , | Leave a comment

Designing the X Axis for the CNC Router

 In the last article in this series, I talked briefly about the design of the Y-axis for my CNC Router that I intend to build. In this article, I will conclude the design phase of the machine by discussing the X-axis design concept.

The beauty of this design is in it’s simplicity. The X-axis is made up of a single sheet of medium density fiberboard that is 24″ x 48″ that is beveled to 45 degrees along both 48″ sides. On each of these beveled sides runs a length of 3/4″ x 3/4″ angle aluminum. Continue reading

Posted in Shop Talk | Tagged , , , | Leave a comment

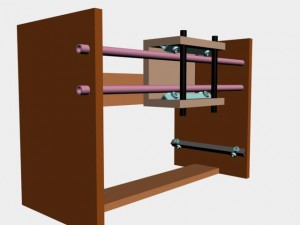
Designing the Y Axis for a CNC Router

Y-axis gantry with the Z-axis installed

Y-Axis Gantry With Z-Axis Installed

In the last post in this series, I talked about the design of the Z-axis for the CNC Router I am designing. In today’s post, I want to briefly discuss the design of the Y-axis. The Y-axis is essentially the same as the Z-axis except it is larger and is turned horizontal instead of vertical. The purpose of the Y-axis is to carry the Z-axis from one end of the table to the other.

In this design, the Z-axis travels from left to right along the steel tubes of the Y-axis. Although not shown in the graphic, a stepper motor will be installed on the left side of the Y-axis that will drive a lead screw that is responsible Continue reading

Posted in Shop Talk | Tagged , , , , , | Leave a comment

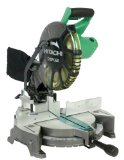
How to Cut Crown Moulding

How to Cut Crown Moulding

Compound Miter Saw

Since the last time you were here, I didn’t have time to get the Y-axis drawings done for my CNC Router so today I want to talk just a few minutes about how to cut crown moulding. First there seems to be some division about the correct spelling of the word moulding. The British version of the word uses the “ou” form while in America, you see it spelled molding. No matter how you choose to spell it, being able to cut it correctly is the important thing.

To me, no room is really quite complete without crown moulding and baseboard moulding to finish the top and bottom of the wall. Even in rooms with sheetrock Continue reading

Posted in Shop Talk | Tagged , , , , , , | Leave a comment

Creating the Bow for the 24″ Ribbon and Bow Shelf

Photo of the Ribbon and Bow Shelf

24" Ribbon and Bow Shelf

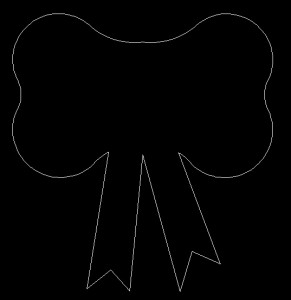
In the last article in this series, I explained how to make the ribbon for the 24″ Ribbon and Bow Shelf. In this article, we will create the bow for the shelf. The outer part of the bow is actually one of four parts of the complete bow assembly and is fairly easy to make since bows are not usually symetrical. The image below shows how the outer bow should look.

The Outer Bow part

The outer part of the bow

To create this part of the bow, first cut a piece of 1 x 4 material 3-3/8″ long. The simplest way to make this part is to refer to the image above and draw the pattern on a piece of posterboard freehand that looks like the image and fits on the 1 x 4 piece you cut earlier. This may take a bit of trial and error, but this method is much easier than trying to draw out the pattern with arcs and lines. Once you have the pattern sized properly and cut out, simply trace it onto the piece of 1 x 4 and cut it out. When you’ve sanded this piece, lay it aside and we’ll create the inner part of the bow.

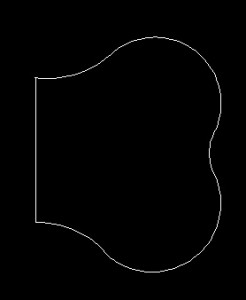
Image of the inner bow pattern

One half of the inner bow pattern

The inner part of the bow will be a little more complicate to make because it has to be cut at a 45 degree angle to make the completed bow 3 dimensional. Using the image above, lay out a rectangle on a piece of poster board that is 1-3/4″ long and 2-5/16″ wide. Freehand a sketch on this piece of posterboard until you get an image like the one pictured above. The straight side of the pattern must be 1-1/2″ wide. The bow does not have to be perfect because ribbon bows are not usually perfect. Just get as close as you can.

The first step to cutting this part of the bow is to take a piece of 1 x 4 that is at least 12″ long and cutting a bevel of 45 degrees on both ends of the piece. The reason you will need a piece of wood this long is for safety when making the 45 degree cuts. Trying to cut any piece of wood that is too short to fit across the gap on your miter saw and too close to your hand is simply too dangerous. A bevel cut, as you may already know, is an angled cut through the piece of wood from one face of the piece to the other. A miter cut is an angled cut across the face of the piece from one edge to the other.

Take the piece of 1 x 4, lay the pattern on one end and trace around it, then do the same thing on the other end of the board. It does not matter which face of the board you draw the pattern on as long as you do the same on both ends. Now cut out the two pieces with the saw of your choice, sand them, and lay them aside for later.

The last piece of the bow is the knot and is made by simply cutting out a 1-1/2″ circle from a scrap of 1 x 4 and then cutting the circle in half. Using a belt sander, round over the front and back edges of the knot to give it a contour on both sides of the arc. Do not sand the straight cut on the knot because this is the part of the know that attaches to the outer bow.

Using the images below, assemble your bow pieces using wood glue and clamps. Let the bow sit over night to give the glue time to dry. Now attach the bow to the center of the face of the ribbon you made in the last article.

Bottom view of the bow assembly

Bottom View of the Bow Assembly

Front view of the bow assembly

Front View of the Bow Assembly

In the last article in this series, we will be assembling all the parts of the shelf that we have cut out in the previous articles. Until next time be careful, and as always, thanks for stopping by.

Posted in Wood Projects | Tagged , , , | Leave a comment

Designing a CNC Router

This morning I got up really excited about designing the parts for my cnc router. I fired up AutoCad and loaded up the website that contained the pictures of a machine design I wanted to pattern my machine after.

build you own cnc router

Z-axis for the CNC Router

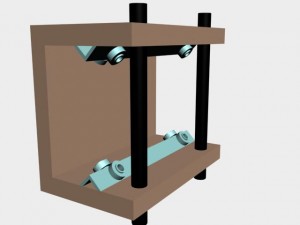
The design I’ve chosen for my machine consists of a series of C-shaped components that house aluminum angle to which skateboard bearings are attached that roll along two lengths of black steel 3/4″ pipe.

The machine will be designed using a gantry for the Y-axis that carries the Z-axis. In the gantry design, the Y-axis and Z-axis both move along the X-axis providing a 3-axis cutting motion. The linear bearings are designed using pieces of 3/4″ aluminum angle to which four skateboard bearings are attached.

I should be able to complete the design of the Z-axis today using AutoCad. This axis uses 3 pieces of medium density fiberboard (mdf), two linear bearings, and two short pieces of black steel pipe so it shouldn’t take too long to get the drawings complete.

When you come back, I should be well on my way to having the drawings done for the Y-axis and we’ll talk a little about that part of the machine. Until next time, stay safe, work hard, and as always, thanks for stopping by.

Posted in Shop Talk | Tagged , , , , , , | Leave a comment

Build Your Own CNC Router

Today I received an order for several 24″ shelves that would all be exactly alike. This set me to thinking more seriously about something I had been considering for a long time. I have wanted a CNC Router since the day I saw a video on the internet of one in action. Today I finally made up my mind to venture out and build one for myself.

I began by doing a lot of research on the internet about the process of building a CNC Router and found several sites about the subject. There are several sites that show machines using skateboard bearings and black steel pipe for the linear motion and 1/4″ all-thread to convert rotary motion from the stepper motors into horizontal and vertical motion.

I decided on a plan that looked fairly easy to build with the tools I already have in my shop and the one most popular on the internet. I will use AutoCad to design the parts and will be using medium density fiberboard (MDF) as my support material because that’s what everybody on the internet is using, and the fact it is strong, stable, and reasonably inexpensive.

I’ve decided to build my own stepper controller circuit based on a set of plans I found on the internet so the first thing I’ll need to do is place an order for the electronic components needed for the controller circuit. I have a pretty good background in electronics so I feel confident I can accomplish this task with very few problems.

The plans on the internet call for using stepper motors from old inkjet printers for the drive motors. I have several old printers laying around the shop, so one of my first priorities is to strip out the parts I will need from those printers. This should give me the stepper motors I need as well as a suitable 12 volt power supply to power the circuits.

I will place my order from an electronics supplier that I have used many times in the past for the parts I can’t get from the printers. While I wait for the parts to arrive, I will get busy designing the plans for my machine. I want to be ready to start working on the machine when I get the parts in for the circuitry.

When you come back, hopefully I will have some of my drawings done and I’ll talk about that. Until next time, stay safe, work hard, and as always, thanks for stopping by.

Posted in Shop Talk | Tagged , , , , , , , | Leave a comment

How to Sharpen Drill Bits

Last night I was working on a project in the shop that I have been putting off for some time. I needed to drill several holes in the piece I was working on but found out rather quickly that the drill bit I was trying to use was in serious need of sharpening.

Drill bit, how to sharpen a drill bit

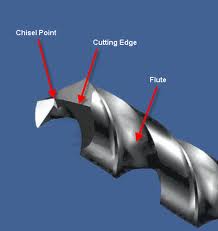
Standard Twist or Fluted Bit

There are several types of drill bits, each made to do a different job, so it’s important to select the right bit for the job. Even the right bit won’t help much if it is not sharp. The type of bit I’m talking about here is the standard twist bit or fluted bit. The really good bits are generally made by placing a steel blank in a computer controlled milling machine and cutting the flutes in the bit by rotating the bit as the cutter passes along the bit’s length.

Cheaper bits are made by actually twisting the bit after the flutes have been formed in a straight piece of steel. These types of bits are made with inferior quality soft grade steel. A good indicator of a cheap drill bit is if it bends when you’re using it. High quality bits will break if stressed too much.

My preferred method of sharpening a fluted bit is by using my bench grinder. A really high quality bit has such hardened steel that it is very difficult for me to sharpen them with a whetstone. Here are some tips to help you get your bit back to tip-top shape for your next drilling job.

1. Always wear eye protection.
2. Keep a small container of water near the grinder for cooling the bit. An overheated bit is renderend useless very quickly.
3. Always rest the bit against the grinder rest to prevent the bit from being pulled from you hand.
4. Lightly touch the bit to the grinding wheel for a very brief period and then dip the tip of the bit into the water. You do not want steam coming from the bit when dipped in the water. This is a good indication that the bit has gotten too hot.
5. Rotate the bit against the grinding stone in the same direction the bit turns when drilling.
6. The cutting surface of the bit must slope slightly away from the cutting edge. If this surface is sloped toward the cutting edge, the bit will simply rub on the surface and never start cutting.
7. Maintain an angle of approximately 30 degrees taper from the point to the sides of the bit.

If you follow these guidelines, you can test to see if the bit is sharp by dragging the edge along your fingernail. If the edge grabs at the nail, the bit is sharp. If it merely slides on the nail with no resistance, the bit needs more work.

Well I’ve got my bit sharp again so I’m ready to get to work. So until next time, stay safe, work hard, and as always, thanks for stopping by.

Posted in Shop Talk | Tagged , , , , | 1 Comment

Circular Saw Repair

This morning I went into the shop to begin work on a new project. The air was cold and crisp, the temperature around 26 degrees, and the sun was shining brightly. I was inspired this morning to work on some cabinet doors that I had to build for a kitchen remodel. I soon realized that instead of working on the doors, I would be working on my circular saw because it would not run.

This type of thing is quite common in my shop since most of the tools in there are older than my children. This particular saw is a Porter Cable brand and has worked very well for me for several years. I actually got the saw when my youngest son worked with a salvage company here in town. His job was to strip off all the usable parts from trucks for salvage. One of the perks of his job was anything that was left in the vehicle by the previous owner was his for the taking.

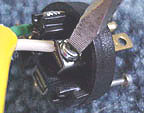
My first instinct when one of my tools stops working is to try another outlet to make sure I have a reliable power source. This morning I had plugged the saw into an extension cord, so I first tried the saw directly in a known good outlet in the shop. The saw still did not work. I got out my screwdriver and removed the newly installed plug on the end of the cord.

Electrical plug, circular saw repair, how to repair a circular saw

The wire had pulled loose from the screw

There the problem was quite obvious. One of the wires in the plug had pulled loose from the screw that secures it to the blade prong. I replaced the wire, tightened the screw, checked the other wire, put everything back together, and voila, the saw worked as good as new.

I then remembered that I had last used the saw on a job building a pump house. During the job, the cord had become entangled under some lumber and caused me to pull the saw cord a little too hard. All this rambling brings to mind six points that I want to give you when one of your tools stops working.

Rule #1. Before discarding a tool that has stopped working, check to make sure that your power source is reliable. Many times an extension cord can be the culprit. Before you plug the tool into an outlet, check that outlet with another tool first to ensure there is power there. Occassionaly a breaker can be tripped in the breaker box causing you to lose power to that circuit.

Rule #2. Before you place your hands around a blade on a tool that is not working, make sure you unplug the tool. A wire could be loose inside that could make contact at the wrong time causing the tool to start while your hands are in the wrong place. Bad News!

Rule #3. Before you work on any electrical device, unplug it or switch off the breaker if the tool can not be unplugged. Electricity is deadly.

Rule #4. Always check the easiest and cheapest things first. If the tool suddenly stops working, check the wires in the cord first. Then work your way into the tool next.

Rule #5. When you remove parts from the tool, put them in a container so you don’t lose any parts. There’s nothing worse than repairing a tool that you still can’t use because you lost some of the parts.

Rule #6. If you can’t put something back together that you took apart, don’t attempt the repair yourself. Let a professional do the job for you.

Well my saw is fixed and now I’m ready to get to work on those doors. So until next time, work hard, stay safe, and as always, thanks for stopping by.

Posted in Home Repairs | Tagged , , , , , | Leave a comment

Creating the Ribbon for the 24″ Ribbon and Bow Shelf

Photo of the Ribbon and Bow Shelf

24" Ribbon and Bow Shelf

In the last article, I explained how to make the vertical support braces for the 24″ Ribbon and Bow Shelf. In this article, I will be walking you through the steps to layout and make the Ribbon for the shelf.

The ribbon for this shelf is made from a piece of 1″ x 4″ material that is 16″ long. The illustration below shows how the finished ribbon will look when it is cut out. So grab your poster board and let’s get started designing the pattern for the ribbon.

Illustration of the ribbon for the 24" Ribbon and Bow Shelf

Layout of the ribbon for the 24" Ribbon and Bow Shelf

To assist you in laying out the pattern for the ribbon, you will need a piece of cardboard that is 16″ x 18″ and should be reasonably thick because we will be pushing pins into the surface. We will also need one piece of poster board that is 16″ x 2″ for the pattern and three pieces of poster board that are 1″ x 12″ that will act as our compasses. A standard compass is not capable of drawing an arc the size we need for this pattern, so we will create a make-shift compass.

To get started laying out the pattern, take the piece of cardboard and place it on a work surface so that one of the 16″ sides is at the bottom nearest you. Now measure 8-1/16″ from the bottom and place a mark on both the left and right side of the cardboard. Take the 16″ x 2″ strip of poster board, orient it with one of the 16″ sides parallel with the 16″ side of the cardboard, and place the bottom of the pattern on the two marks you just made. Place a strip of masking or blue painters tape on each side to hold the poster board in place.
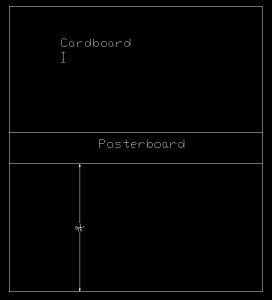
Illustration of posterboard on cardboard

Posterboard placed on cardboard

We now need two measurements to establish the center point of the first two arcs that we will be drawing. Measure 2″ from the left and 3/8″ from the bottom and place a mark at this intersection on the piece of cardboard. Now measure 2″ from the left and 1-3/4″ from the bottom of the piece of cardboard and place a mark at the intersection of these two points.
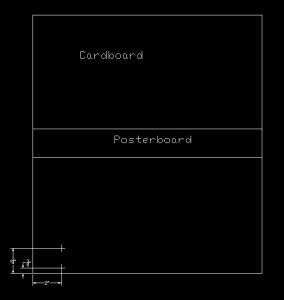
Illustration of the first two arc center points

Center points for the first two arcs

Now we will be making three compasses to draw the arcs for the ribbon. Take one of the 1″ x 12″ pieces of poster board and measure up 1″ from one of the narrow ends and 1/2″ from the long side and place a mark at the intersection of these two points. Then measure 8-1/8″ from this mark and place a second mark on the compass 1/2″ from the side.
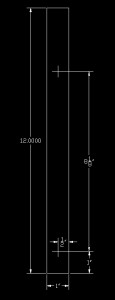
Make-shift Compass

This is the 8-1/8" compass

Now you need to make two more compasses one with a measurement of 8-3/16″ between the holes and the other with a measurement of 8-1/16″ between the holes. Label each compass with the measurement between the holes so you’ll know which one to use by its radius.

To draw the first arc on the pattern, take the compass that you labeled 8-3/16″ and place a hole through one of the marks just large enough for the point of a pencil the protrude through. Take a push pin or thumb tack and place it through the other mark. Now pin the compass to the mark that is 3/8″ from the bottom of the cardboard. Before putting the pencil through the hole, position the compass as indicated below.
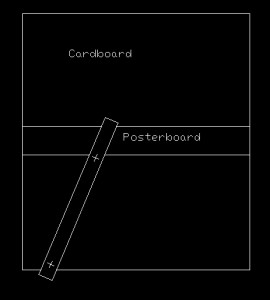
Illustration of compass in first postion

Compass in position to draw first arc

Now place the pencil point through the hole and pivot the compass to the left. This action will draw our first arc on the pattern.
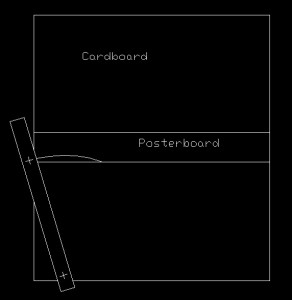
First arc drawn with the compass

Our first arc is drawn

You must be absolutely sure to keep the compass flat and straight through the swing or the arc won’t be correct. Now take the compass that is labeled 8-1/8″ and pin it to the hole that is 1-3/4″ from the bottom of the cardboard and draw the second arc.
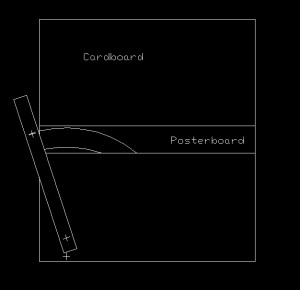
Ribbon with first two arcs drawn

Ribbon with the first two arcs drawn

If your arcs look like the illustration above, congratulations you’re half way done with the pattern layout. To create the 2nd set of arcs for the ribbon, measure 6″ from the left and 1/2″ from the top of the cardboard and place a mark at the intersection of these two points. Now measure 6″ from the left and 1-7/8″ from the top and place a mark at the intersection of these two points on the cardboard.
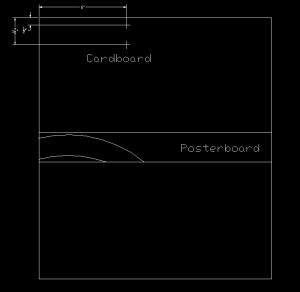
Top two pivot points for the ribbon

Top two pivot points

Using the compass labeled 8-1/8″, pin the pivot point at the mark 1/2″ from the top of the cardboard and draw the first arc. Using the compass labeled 8-1/16″, pin the pivot point at the mark 1-7/8″ from the top and draw the second arc for the ribbon. If you did everything correctly, your pattern should look like the illustration below.
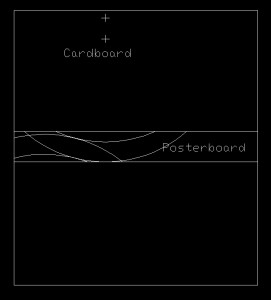
Ribbon with all arcs drawn

Ribbon with four arcs drawn

Don’t worry too much if your top and bottom arcs don’t intersect perfectly, you can fix it when you cut it out. Now measure 8″ from the left side of the pattern and draw a vertical line all the way across the pattern. Then take a straight edge and make the angle on the left end of the ribbon as shown in the illustration below.

Ribbon layout finished

Ribbon layout finished

Now all that’s left to do is remove the tape from the pattern, fold it in half at the line you drew, folding the right half under the left half so your lines are visible from the top, and cut it out following the diagram above.

When you have the pattern cut out, it should look like the first image at the top of this article when you unfold it. Now trace the pattern on to your piece of wood. Cut it out with your saber saw, band saw, or scroll saw,  sand it, and you’re ready to move on the next part of the shelf.

In the next article, I’ll describe how to make the bow that sits on top of this ribbon. See you then and as always, thanks for stopping by.

Posted in Wood Projects | Tagged , , , , , , , , , , , , | 1 Comment